
Introduction to CSS
Introduction to CSS
Introduction to CSS is a free HTML for Kids lesson on CoddyKit. This is lesson 1 of 1. You can read the complete lesson below for free — then practise it hands-on in the browser with a built-in code editor and a 24/7 AI tutor. It is part of the HTML for Kids learning path, and your progress syncs across the web and the CoddyKit app. The HTML for Kids course includes 1 lessons in total.
Introduction 1
Hi,
In the previous chapter, we learned what CSS is and why we should use it. Now I want to make a quick introduction with a simple example.
Let's define a simple HTML page.
<html>
<body>
		<h1>Hello CSS</h1>
</body>
</html>
Inline Style
Now, let's want to change the color of our Hello CSS header to red. For this, we will use the style attribute that can be added to almost any HTML tag.
With this attribute, we can define a style in each element as inline.
When we look at the preview section, we will see that the color of the header turns red.
color: red;
We have painted the font color of the element with a style definition.
<h1 style="color:red;">Hello CSS</h1>Inline Style 2
You will remember that we have said that we use attributes to assign behaviors and attributes to tags in HTML.
One of the most important of these attributes in style is that we use the style attribute to define a style for tags.
Inline Style 3
Now let's add a new style. We can increase your text size with font-size.
When defining multiple styles, we need to separate the styles with semicolons.
In the example below, the color and font-size styles are separated by semicolons.
<h1 style="color:red;font-size:50px;">
         Hello CoddyKit
</h1>
Style Definition
Syntax is important when adding style.
styleName: styleValue;
Let's remember again that we need to assign style as above.
Example
Now let's expand our example a little more.
<html>
<body>
<h1>Hello CoddyKit</h1>
<p>Lorem Ipsum is simply dummy
text of the printing and typesetting industry.
Lorem Ipsum has been the industry's standard
dummy text ever since the 1500s,
when an unknown printer took a galley of
type and scrambled it to make a
type specimen book.</p>
<h1>Hello CSS</h1>
</body>
</html>
Example 2
In this example, we want to change the color of all text to red. For each tag, we can define the style as follows.
<html>
<body>
<h1 style="color:red;">Hello Coddy</h1>
<p style="color:red;">
Lorem Ipsum is simply dummy
text of the printing and typesetting industry
Lorem Ipsum has been the industry's
standard dummy text ever since the 1500s,
when an unknown printer took a galley
of type and scrambled it to
make a type specimen book.</p>
<h1 style="color:red;">Hello CSS</h1>
</body>
</html>
CSS Selector
But it doesn't look very good that way, does it?
Because now we have 3 elements on the page, we changed the text color of each to red. However, considering that this number has increased to 3000, it does not make much sense to define a style for each one.
Instead, we need to use CSS selectors instead of defining each element inline.
Intro 12
Now, let's learn the concept of the selector.
CSS selectors are responsible for selecting the relevant HTML element contained in the document to style HTML elements.
So, as we can understand from the name, they choose HTML elements. 😂
CSS selectors must be defined between <style> tags in the HTML document or in an external CSS file.
In our examples, we will use what is usually between style tags. However, it is more precisely to define the style in an external CSS file.
Intro 13
The dot operator and the class name are used to define a class between style tags. And style definitions are made between the braces.
.class-name {
font-size:22px;
color:red;
}
In the example below, we have defined a class named my-component among the style tags. and font-size style is assigned to the corresponding class.
<style>
  .my-component{
	font-size:22px;
}
</style>
Now let's define two paragraph elements
Now let's define two paragraph elements that have my-component class.
After this definition, since both paragraphs have the same class name, they will be chosen by the CSS selector, and their font-sizes will be updated as 22px.
<style>
  .my-component{
	font-size:22px;
}
</style>

<p class="my-component">Hello CoddyKit</p>
<p class="my-component">
Lorem ipsum dolor sit amet, consectetur
adipiscing elit. Aenean maximus neque diam,
in tristique tortor volutpat a. Vivamus porttitor
id est et suscipit. Duis interdum at sem sed vestibulum.
Phasellus sit amet ullamcorper libero, a vestibulum libero.
Fusce laoreet nunc a pharetra viverra.
</p>
Intro 6
We can assign more than one style to a selector.
In the example below, both font-size and color style are defined in the same selector.
<style>
  .my-component{
   font-size:22px;
    color:red;
  }
</style>
Nesting CSS Selectors
Let's analyze the HTML code below.
A paragraph element has been defined, and a span element containing 'Hello CSS Selectors' content has been added to this element.
In this case, we can say that the paragraph element is the parent of the span.
On the other hand, the span will also be the child of the p element.
Just like living beings, we will use HTML elements in parent-child relationships according to their placement in the code block.
<p>
   <span>Hello CSS Selectors</span>
</p>
Nesting CSS Selector 2
Let's expand our example a little further and analyze the hierarchy between the elements again.
- According to the example below
- The <span> and <a> element are siblings of each other.
- The <span> and <a> element are descendants of the div element.
- <span> and <a> are children of element <p>.
- The element <p> is a child of the <div> element.
<div>
   <p>
   <span>Hello CSS Selectors</span>
    <a href="https://coddykit.com">
         Go CoddyKit
     </a>
  </p>
</div>
analysis tree model
Let's take a closer look at the image above.
The following HTML code sample has been converted to a tree model.
Note that the tree model is actually a reflection of the parent-child hierarchy.
<!DOCTYPE html>
<html>
<head>
<title>CoddyKit</title>
<meta charset="UTF-8">
</head>
<body>
<h1>This is a Heading</h1>
<p>
  <a href="#">Link</a>
  <br/>
  <span>lorem ipsum</span>
</p>
</body>
</html>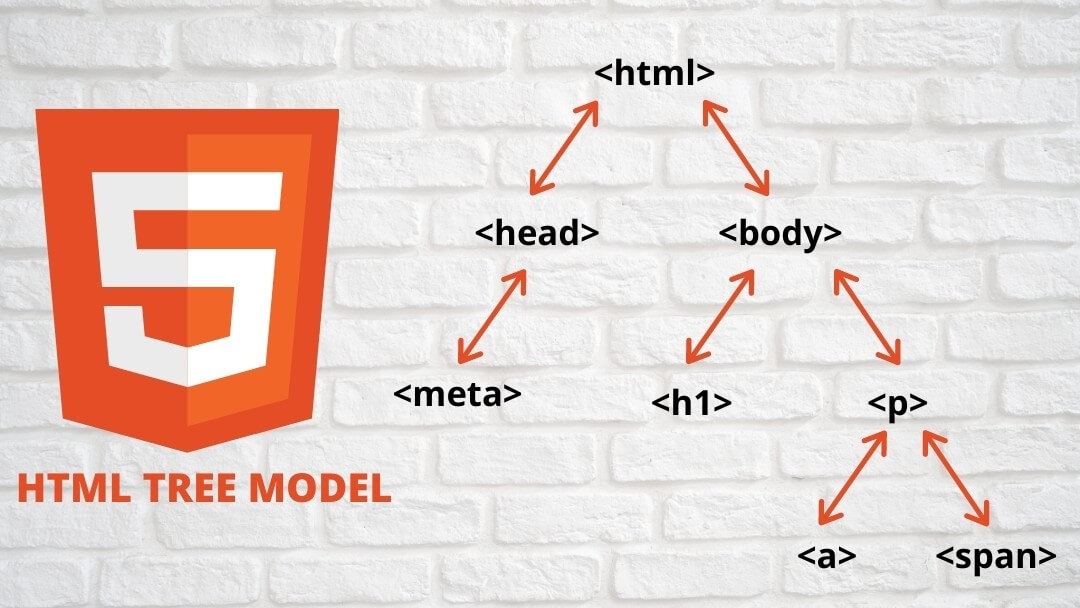
So when do we use this hierarchical relationship?
So when do we use this hierarchical relationship?
Let's do an example first and pose a problem. Then we see how we can provide solutions using this hierarchy.
Let's look at the code example below.
Let's say we want to paint all the text red. In this case, we have learned two different uses so far.
- First and worst of all, we will define the style (style = "color: red") attribute inline to each element.
- Second, we will define a class named red-txt and assign each element as an attribute (class = "red-txt").
But there is an easier way to do this. 🥳
<div class="root">
   <span>This is a span element</span>
   <div>
      <p>This is a p element</p>
      <p><span>
              This is a span element
             </span>
       </p>
   </div>
</div>
So when do we use this hierarchical relationship? 2
Let's take a look at the above code again.
When we pay attention to the div element with a class named root, we see that it is actually the ancestor of all the elements in our example.
Genetic traits in humans are passed down from ancestor to descendants. The style assigned to an ancestor in CSS is also reflected in the descendants.
In this case, when we make a style definition that selects the relevant div element, we can expect all of its descendants to be affected by this assignment.
Let's do it.
So when do we use this hierarchical relationship? 3
Let's define a class named root with the help of a dot operator and make a style definition (with color: red) inside it.
It will select all the elements that have the root class and make the text colors red for itself and its descendant.
When we look at the Preview section, we will see that the colors of all texts turn red.
<style>
.root{
  color:red;
}
</style>

<div class="root">
   <span>This is a span element</span>
   <div>
      <p>This is a p element</p>
      <p>
       <span>
           This is a span element
       </span>
      </p>
   </div>
</div>
Inheritance
We can express this concept in CSS as Inheritance. And we have learned to write our code shorter using this feature.
As in the previous example, instead of defining the same property for each element one by one, we defined this property to the ancestor element and prevented code repetition.
Head Element Placement
In the previous examples, we added the style element right next to the HTML element we wrote.
However, the correct area where the style tag should be inserted is between the head tags.
And the usage will be more accurate as follows.
<!DOCTYPE html>
<html>
<head>
<style>
.hello{
   font-size:30px;
}
</style>
</head>
<body>
<h1 class="hello">This is a Heading</h1>
</body>
</html>
write our codes as short as possible and reusable.
While coding, we need to write our codes as short as possible and reusable.
Congratulations
Congratulations 🎉
In this section, we learned the concepts of Selector and Inheritance with you.
In the next section, we will learn the style definition types in CSS.

Learn HTML with an AI tutor — free
Write and run real code in your browser, get instant help from a 24/7 AI tutor, and pick up where you left off on the web or in the app.
- Courses
- 16
- Lessons
- 35
Frequently Asked Questions
Is the “Introduction to CSS” lesson free?
Yes — the full text of “Introduction to CSS” is free to read here on the web. To practise it interactively (a built-in code editor and a 24/7 AI tutor) and unlock the rest of the HTML for Kids course, upgrade to CoddyKit PRO. The HTML for Kids course includes 1 lessons in total.
What will I learn in “Introduction to CSS”?
Introduction to CSS You practise HTML for Kids with hands-on code you run directly in the browser, and a 24/7 AI tutor answers your questions as you work through the lesson.
Do I need any experience to start HTML for Kids?
No prior experience is required. HTML for Kids on CoddyKit is structured for beginners through advanced learners, so you can start here or from the beginning and move at your own pace. This is lesson 1 of 1.
How long does the “Introduction to CSS” lesson take?
Most CoddyKit lessons take about 5–10 minutes. Each one is bite-sized and interactive, so you make steady progress and pick up exactly where you left off across the web and the app.
Can I write and run code in this HTML for Kids lesson?
Yes. Every HTML for Kids lesson includes a built-in code editor, so you write and run real code right in your browser and get instant AI feedback — no local setup required.